Recently, I posted a query about session topics to a group of attendees of an upcoming indie biz conference that I’ll be speaking at. The responses I’ve received so far line up nicely with my planned curriculum, but I also received the following reply and accompanying screenshot from a crafter named NK:
“I’d like to know what all this stuff means And how should I be labeling it?”
That is a screenshot from the WordPress Insert Media screen. I usually cover this in my WordPress II workshops, and I was writing NK back to say as much, when I remembered that the conference isn’t until April, which meant she would either have to wait til my talk in April or to try to figure out how to properly describe that particular screen and then comb through Google to find a decent answer.
Neither of those are good options!
See, this particular screen is actually kind of important. In terms of Search Engine Optimization, labeling your images is one of the easiest ways to do basic optimization on your website. Also, there are significant differences in the behavior of the fields: for some of the fields, viewers will see the text, for some they won’t and for others the text will be visible, but only if the image is clicked a certain way. Whatever the reason, it’s much better to start using this screen correctly now, rather than having to go back and re-edit 4 months of posts.
To that end, I decided to explain that particular screen right here, right now, no waiting for April.

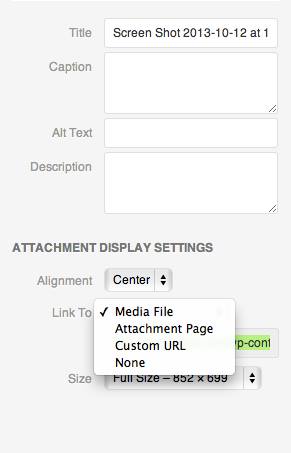
First, some context. This is the sidebar of the Insert Media screen that appears when using the “Add media” function in a WordPress page or post.
1. Title
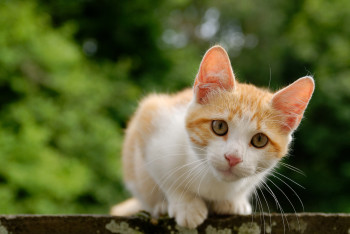
This field will auto-populate with the name of the image file. So if your file is named “kitten.jpg”, by default this field will display “kitten”. The text entered here will show in the code pulling the image, but it will also display when a user hovers over the image, usually in a small yellow box.
While the screenshot NK posted doesn’t include anything about the image file name, I’m going to bring it up anyway. The image file name (i.e. “kitten.jpg”) is one of the ways search engines determine what is going on in an image. If what is going on in the image relates to page’s content, the search engines will index the page more accurately … essentially giving your keyword strategy additional “umpf”. To put it another way: No one is searching for IMG098776. But people are searching for kittens.


2. Caption
The WordPress caption behaves like you might expect a caption to behave: It is text that provides detail and context to the viewer about the image, and is often displayed beneath the image. How (or if) the caption displays is determined by your WordPress theme. As far as SEO goes, if you’ve got your keywords in the caption, it counts as having them as part of the main text of the page.
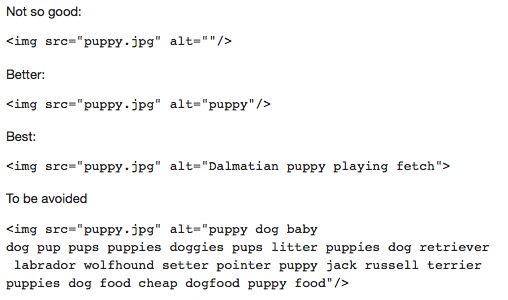
3. Alt text
Alt text stands for “alternative text”. It is not normally displayed on screen, but it will display for viewers who have images turned off or who are using screen readers for accessibility.
Alt text is also the most significant setting in an SEO sense. So significant, in fact, that Google’s go-to SEO explainer Matt Cutts has a little video about it:
What he says, essentially, is that the alt text tells Google what the image is about, even more so than the image file name.
What that means, essentially, is that if you do nothing else, you should fill out this field at every possible opportunity, briefly describing the image and incorporating your keyword strategy .
4. Description
The description can also be important, but please note: this is not the same thing as a meta-description, which shows up on search engines. This field is primary related to WordPress and how the image shows up on your site.
Although the description can be used for display by your theme, it is not common. Primarily the description appears as the main text on the image’s attachment page, which are automatically created for each image you upload to WordPress. Attachment pages have addresses like:
http://sereedmedia.com/?attachment_id=563#main
and, depending on your theme, display things like the image, its title, its description, its size, its upload date. etc.
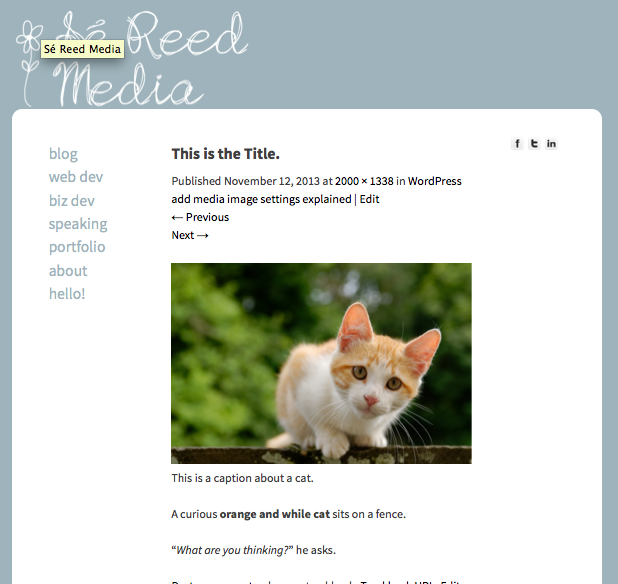
That means that not only will the information you enter for the image be helpful in optimizing the post or page you’re using it in, but it can serve to optimize the attachment page as well. And since these pages are auto-generated, they double your SEO-efforts with no extra work!
5. Alignment
This one is pretty self-explanatory, and most folks have no trouble understanding it. It’s usually pretty straightforward:
![]() Aligned left means the image will be flush to the left side and text will wrap around to the right.
Aligned left means the image will be flush to the left side and text will wrap around to the right.
![]()
Aligned center means an image will appear in the center, with no text on either side.
Aligned right means the image will appear flush to the right side and text will appear on the left (depending on how the text is aligned). ![]()
![]() None means the alignment will default to the most basic setting, usually aligned left with the text aligned to the bottom edge of the image.
None means the alignment will default to the most basic setting, usually aligned left with the text aligned to the bottom edge of the image.
The only time this can get tricky is if a theme’s settings override the settings specified here. Then you can right-align and left-align all you want, but the image will stay aligned where the theme is telling it to, until you update the code, override the override, or get a new theme. Things like the amount of spacing between the the text and the image is also determined by your theme.
6. Link To
This field allows you to specify where, or if, the image should serve as a link.
Media File: links to the image itself. By default this will take the viewer to a new page that has only the image on it. Sometimes this option is used to display the image in a lightbox.

Attachment Page: Links to the image’s attachment page (as discussed in Description, above)
Custom URL: Linking to a custom URL allows you to use the link to direct traffic to a specific page, post, or external link.
None: No link, just an image that won’t click. Good for logos, icons, etc.
7. File Size
Every time you upload an image to WordPress it automatically uploads up to four versions of the image. A thumbnail, a medium size, a large size, and the original, full size. The thumbnail, medium and large sizes are set in the Settings>Media screen.
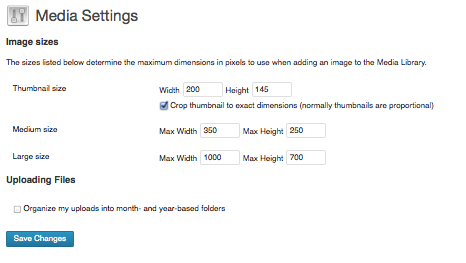
WordPress likes to keep things pretty, so if your original image size is smaller than any of the size iterations, WordPress won’t stretch it to make the bigger sizes. Also the settings are not dynamic, meaning if you edit the size settings, WordPress will use those dimensions for all new images added, but it won’t go back and re-size your existing images (you can use a plugin to do that).
The image size you should use in a page or post will depend on your individual settings and the needs of that post. I tend to use the medium size the most, but as long as your image sizes are consistent, you can use whatever suits you best!


And that’s it! A brief tour of the WordPress image settings, a cute kitten and no waiting til April.
Leave a Reply to JS Morisset Cancel reply